💬Communicator Wiki(Installer Setup)
Contents
- 1 GranSun PBX System Dashboard
- 2 Extensions
- 3 Show Advanced Options
- 4 Enhanced Services
- 5 Direct Inward Dialing (DIDS)
- 6 Interactive Voice Response(IVR)
- 7 Dial Groups
- 8 Voicemail
- 9 Monitoring
- 10 Reports
- 11 Statistics
- 12 Conference
- 13 Set Up and Manage Meetings
- 14 Fax Management
- 15 Routes
- 16 Least Cost Routing (LCR)
- 17 Service Plans
- 18 Apps
- 19 Trunks
- 20 SMS
GranSun PBX System Dashboard
- The PBXware System Dashboard gives a real-time overview of important info, including service status, call stats, licensing, app usage, and hardware performance.

- Calls Overview
The Calls Overview shows the number of live calls, calls in the past hour, today's calls, and the percentage of answered calls.

- SIP Registrations
SIP Registrations shows the number of successful, failed, and lagged SIP registrations. You can click on any of these values for more details if they're not zero.

- PBXware Services
The PBXware Services section monitors the status of key system services:
PBXware: Main service for web interface access. PBX Service: Core service for making/receiving calls. PBXware Proxy: Connects to Asterisk Manager for event handling. Push Notifications: Wakes up mobile devices for calls. Chat Server: Manages messaging for desktop and mobile apps. Memcached: Stores data for PBXware Proxy.

- CommunicatorGO(gloCOM) Editions Online
Editions online section displays information on apps registered to PBXware and the editions they use. Note that mobile devices may show inaccurate data because they reduce power consumption by limiting CPU and network activity when apps are in the background. Communicator GO can be disconnected from the server or miss incoming calls when the device enters Doze mode (Android) or suspension (iOS). Doze mode activates after an hour of inactivity on Android, and iOS apps suspend after 10 minutes in the background.

- Extensions Online
Extensions online diagram shows the number of online extensions compared to the total number of PBXware extensions.

- CommunicatorGO(gloCOM) Users
CommunicatorGO(gloCOM) Users diagram shows the number of logged CommunicatorGO(gloCOM) users contrasted to the total number of available licenses.

- Licensing
Licensing section helps to prevent issues with licensing by showing percentage usage information of your PBXware license for extensions, IVRs, Queues, and conferences

- System Hardware Usage
Hardware usage segment shows important information on the current server load, it also helps easily monitor main hardware components such as disk space, CPU, and memory usage.
Disk Usage: Disk usage displays information on current PBXware hard disk usage. CPU: CPU section shows information on current CPU usage on PBXware server. Memory: Memory section shows information on current PBXware memory usage.

Extensions
- This section displays all UADs/Phones registered to the current slave tenant. In a Multi-Tenant PBXware setup, this menu is only accessible while editing a tenant, as the master tenant handles overall system control and tenant management.
- Add Extension: Click the Add Extension icon to open the extension creation screen.
Search: Use the search bar to find extensions by Name, E-mail, Extension number, or MAC address. CSV Download: Export a CSV file containing all existing extensions for the tenant. This file can later be used to import the extensions into another PBXware system.
- System
This section lists all extensions configured for the selected tenant, displaying key details for each registered UAD/Phone:
Name: Full name of the user assigned to the device Extension: Extension number linked to the device User Agent: Device type or model MAC Address: Unique MAC address of the device Status: Current status of the device (Active or Inactive) Protocol: Communication protocol used (SIP) Edit: Opens the extension’s configuration settings Delete: Removes the extension from the system

- Add/Edit Extension
Adding a new system extension involves two steps. First, you select the UAD (User Agent Device) and define the location of the device—either Local or Remote, Remote is most commonly used. If the desired UAD/Phone is not listed, navigate to Settings > UAD, edit the relevant entry, and set its Status to Active to make it available. In the second step, you'll provide basic user information such as name and email address. When creating an extension within a tenant, note that the username will be prefixed with a tenant code, which is required for the device to register. However, once registered, users can still dial others on the tenant using only their extension numbers.

- General
When creating an extension, you can customize several key fields.
The Extension Number is auto-generated but can be changed to any available number (e.g., 112). The Name field sets the user’s full name, which appears as the caller ID on other devices. E-mail is used for sending system notifications like voicemails and PINs, and also serves as a login credential for Online self care(OSC) when paired with the user password.
The Department field groups the extension within mobile or desktop apps like CommunicatorGO(gloCOM).

- Call Rating
VoIP services usually don't charge per minute for domestic calls, making call rating systems unnecessary.

- Authentication
Username: The default username is the extension number prefixed with the tenant code (e.g., 300112 for extension 112 with tenant code 300). This cannot be changed. Secret: The password used for registration with PBXware, which can be edited.
User Password: The password for CommunicatorGO(gloCOM) registration, automatically populated but can be changed.
Show QR Code: Displays a QR code for easier setup with the CommunicatorGO(gloCOM GO) mobile app, which can be scanned for faster registration. Once registered, users will be prompted to change their password, and the QR code button will be hidden.
Password Requirements: Passwords must meet certain criteria, including length, character types, and special symbols. PBXware provides a password generator to assist in creating strong passwords.
PIN: A Personal Identification Number used for account authorization, accessing voice inbox or services.
Additional Notes: Once an extension is created, the Permissions group can be edited. Always type in values for Name and Email; pasting them will require opening Advanced Options to fix missing details. After creation, the Save & Email button will send extension details to the provided email.

Show Advanced Options
- Extensions Advanced Options
The "Show Advanced Options" button expands the page to reveal additional settings for a more detailed configuration. While not all fields in the advanced settings are filled out by our company, the ones we use will be covered throughout the wiki.
![]()
Network Related
We use TCP as the preferred protocol, although other options are also supported. Additionally, we ensure that NAT Type is set to Yes. These are the only settings we modify in this section. Save the changes as you complete each field.
Enhanced Services
- In Enhanced Services, all required fields must be updated from red X's to check marks. The star icon indicates that the customer can modify the setting as needed, while the notepad and pencil icon shows where you can edit the field on the PBXware site. The main fields used by our company are Caller ID and Directory/BLF List. Save the changes as you complete each field.

- Caller ID
When editing the Caller ID, it is essential to enter the E-911 number specific to the area. In the Default Caller ID, the business's primary phone number should be entered. Save the changes as you complete each field.

- Directory / BLF List
To add programmable buttons, navigate to the Directory/BLF List and click the Plus button. Select whether the button will be a Speed Dial, BLF, or Call Parking. Then, enter the extension number in the Value field, and the Label field should auto-fill accordingly. Save the changes as you complete each field.

Direct Inward Dialing (DIDS)
- Direct Inward Dialing
Direct Inward Dialing (DID) is used to route all inbound calls—entering the system through trunks—to designated destinations within the system.
- DID List Overview
Tenant Indicates which tenant is using the DID. DID / Channel Displays the DID number or PSTN channel slot. Provider The service provider associated with the DID. Trunk Indicates which trunk the DID is routed through. Destination Specifies the destination within the system, such as an extension or ring group. Status Reflects the current state of the DID and associated SMS service. Status Behavior Status | Calls | SMS Active | Enabled | Enabled If a DID is added and SMS is enabled on the Slave Tenant, it appears in the SMS list and is shown as "Active." If changed later on the Master Tenant, calls may stop but SMS can remain functional.
- DID Icons
Edit Click this icon to modify the DID configuration.
Delete Click this icon to delete the DID from the system.

- Add / Edit DID
To add a new DID, log into the Master Tenant and click "Add DID" to open the DID configuration window.

- General Settings
Tenant
Select the tenant that will use the DID.
Trunk
Choose the trunk to receive incoming calls.
DID/Channel (Start)
DID number or PSTN channel where calls will enter.
E.164 Number (Start)
International phone number format (e.g., 12125559876).
- Advanced Options
Click "Advanced Options" to reveal:
Status
Sets the DID as Active or Not Assigned.
Range
Enable to set a DID range.
DID/Channel (End)
Used only if Range is enabled.
E.164 Number (End)
Used for the end of E.164 ranges.

- DID Groups (Multi-Tenant Mode)
When DID mode is set to “Groups” in the Master Tenant settings, DIDs can be grouped and assigned to tenants. Tenants can then manage individual numbers from the group.

How to Enable Group Mode
Go to Master Tenant > Settings > Tenants
Click "Edit" on the Master Tenant
Click "Show Advanced Options"
Set "DID Mode" to "Groups"
- DID Groups List Overview
Group Name A unique name for the DID Group.
Tenant Tenant assigned to the group.
Range Start / End Start and end of the DID range. Edit
Click to edit DID Group. Delete
Click to delete DID Group.
- Add / Edit DID Group
Group Name Unique name of the group.
Tenant Select which tenant to assign the group to.
DID Range Start / End Define the range of DIDs included in the group.

- DID Destination Settings
Destination Select where incoming calls are routed (e.g., Extension, IVR, Fax to Email, Multi-User).
Value The specific extension, email, or IVR number to route to.
Service Plan Sets billing rules based on destination type.
Call Rating Extension Specify the extension to be charged for incoming calls.
- Additional Options
Operation Times Set business hours and after-hours routing.
CLI Validation & Routing Route based on caller ID.

- Optional Settings
Preserve Original Caller ID Retain the original caller ID when routing externally.
Greeting Set a greeting audio file for the DID.
Strip N Digits Removes defined digits from the incoming number.
Replace Caller ID Set a custom caller ID (e.g., USDID %CALLERID%).
Queue Priority Sets queue priority for inbound calls.
Custom Ringtone Assign custom ringtone for supported devices.
Record Call Enable full-duration call recording.
Notify on Not Answer Send email notifications for unanswered calls.
Auto Fax Detection / Fax Destination Enable automatic fax recognition and route accordingly.
- Operation Times
Enable operation times and define:
Default Destination (e.g., 1000)
Is Voicemail
Greeting (e.g., greeting-afterhours)
Closed Dates
Custom Destinations
Open Dates

CSV Upload / Download / Template Buttons allow you to import/export schedules.
CLI Validation & Routing
Create rules based on Caller ID to route calls to different destinations.

Fields:
Caller ID
Destination
Extension
Match Type (Explicit / Begins With)

- Add DID (Group Mode)
In Group Mode, DIDs are added under the Slave Tenant. The “Tenant” field is replaced by “Group.”
Key Differences:
DID/Channel field becomes an autocomplete dropdown
Max 10 options at once
Reserved DIDs are hidden
Prevents duplicate assignment
Interactive Voice Response(IVR)
- Interactive Voice Response
IVR (Interactive Voice Response) is an automated answering system that interacts with callers, provides menu options, and routes calls based on the caller's selection using DTMF tones via their device keypad.
The main IVR page displays a list of all IVRs configured in the system. You can use the # key to transfer a call to a different destination from within the IVR menu.

- IVR List Overview
Name
The name of the IVR.
Number The system-assigned number for the IVR.
Edit Click this icon to open and modify the existing IVR configuration.
Delete Click this icon to delete an IVR. A confirmation prompt will appear: "Are you sure you want to remove XYZ?"
Click OK to proceed with deletion.
Click Cancel to abandon the action.
IVR Search
You can locate a specific IVR by entering part of its name or number in the search field and pressing the Enter key.
Add/Edit IVR
To create a new IVR, click the Add IVR button. This action will redirect you to the IVR configuration page where all settings for the new IVR can be defined.
Note: Before adding a new IVR, ensure a greeting sound is created in advance.
To record a greeting: Dial *301 from a UAD/phone to record directly OR upload a custom file via System → Sounds

- General
IVR Name
Enter a unique name to identify the IVR. (This name will appear when viewing the list of IVRs.)
IVR Number Enter a unique number that will be dialed to access the IVR.
Greeting Select a greeting sound file. (The greeting plays when a caller enters the IVR number, e.g., “Welcome. For Sales, press 1...”)
The file name must begin with greeting-***.
To create a custom greeting: Dial *301 from your extension. The new greeting will be timestamped, e.g. greeting-May-17-2020
- IVR Type
Select the desired IVR type:
Standard IVR – Single-digit options (0–9) Multi-digit IVR – Multi-digit options (10–9999999999) PIN-based IVR – Requires a PIN to reach destinations Meeting IVR – Used for joining audio conferences via DID. Callers must follow prompts to enter a Meeting Number and Participant ID.
Note: If Meeting IVR is selected: A pre-recorded system greeting is used The greeting field will be disabled (grayed out) The Play Greeting option controls how many retry prompts are allowed
- Destination Type
Assign a destination type for each key press (e.g., '1' for Sales).
Available destination types include:
IVR – Enter the number of another IVR Queue – Enter the queue number Conference – Enter the conference number Extension – Enter the extension number Ring Group – Enter the ring group number Voicemail – Enter the extension number linked to the voicemail Directory – Enables name-based dialing. The destination field will be disabled.
Note: With Directory, users can dial the first three letters of the first or last name (based on IVR Options). Timeouts are inherited from IVR General Settings.
Remote Access – Choose between ‘Destinations’ or ‘Voicemail’ Fax to E-mail – Enter the number to email the fax to Call External Number – Define the external number to dial CRM Routing – Select a specific CRM rule
- Destination
Specify the target destination for the digit pressed.
(e.g., If ‘1’ is pressed and should route to John in Sales, choose ‘Extension’ and enter John’s extension.)
Click the More Options button (gear icon) to access advanced settings.
Depending on the selected Destination Type, the following fields may appear:
Default CallerID Override the incoming Caller ID with a custom label. (e.g., Setting "Lobby IVR %CALLERID%" will show "Lobby IVR 55528790" on phones)
Supported variables: %CALLERID% %CALLERIDNUM% %CALLERIDNAME%

Language Set the language for the selected destination. (e.g., us)
Additional Options by Destination Type
If Queue is selected:
Queue Priority Set the caller's priority in the queue. (1 = highest priority, e.g., 5)
If Directory is selected:
Read Extension Number – System will announce the extension number after the name Search for Name – Choose First Name, Last Name, or Both Department Filter – Filter by department (e.g., None, Sales, Support) Exit Digit – Allow caller to exit the directory at any time (e.g., # or 0)
If Call External Number is selected: Only the Default CallerID option will be available in More Options.
- Advanced Options
Clicking the Show Advanced Options button reveals additional configuration settings for the IVR.
Status Set the IVR status to Off to temporarily disable it without deleting. When disabled, all incoming calls will be redirected to the configured Operator Extension.

Example: If Lobby IVR has its status set to Off, and a user dials the IVR number (e.g., 1003), they will not hear the IVR greeting or menu. Instead, their call will be routed directly to the designated Operator Extension.
Operator Extension Select the extension to receive redirected calls when the IVR status is set to Off.
Example: If Lobby IVR is disabled and John dials its number, the call is automatically forwarded to the extension specified here instead of going through the IVR options.
Disable CallerID (PIN-based IVR only) Enable this option to suppress the Caller ID on incoming calls to this IVR. Note: This option is applicable only when the IVR type is set to PIN-based IVR.
- General Settings
Response Timeout (sec)
Specify the number of seconds allowed for the caller to input an IVR option after the greeting has been played.

Example: If this is set to 4, the caller will have four seconds to press an option after the message plays (e.g., “Press 1 for Sales”).
RTP Delay (sec) Set the delay in seconds before the IVR greeting begins playback. This helps prevent the greeting from being cut off.
Example: If this is set to 1, the system will wait one second before playing the greeting. Instead of hearing “..me. For Sales press 1,” the caller will hear the full message: “Welcome. For Sales press 1.” Note: This resolves the issue of partially played audio prompts. A value between 1–3 seconds is recommended.
Digit Timeout (sec) Define the maximum interval between digits when the caller is entering a multi-digit IVR option. Example: If set to 1, the caller has one second to enter each subsequent digit. Dialing 25 requires the second digit (5) to be pressed within one second of the first digit (2), otherwise the system will treat it as 2.
Rings to Answer Set the number of ring tones heard by the caller before the call enters the IVR. Example: Instead of the call being routed immediately to the IVR, you can choose to let the caller hear two or three rings beforehand.
Fax Email Enter the email address where incoming faxes will be delivered. Note: To enable this feature, be sure to activate Fax Detection under: Settings → Protocols → SIP
- Greeting Options
Play Greeting
Set how many times the IVR greeting message will be repeated if the caller does not respond.
Example:
If John enters the Sales IVR and does not press any option, the greeting (e.g., "Welcome. For Sales, press 1...") will repeat the number of times defined in this field before the call is redirected to the Timeout Destination.
Note: This is a required field. If the caller does not respond after the defined repetitions, the call will be disconnected or redirected as configured.

Timeout Destination Choose the Extension Number where the call should be redirected if no IVR option is selected within the allotted greeting attempts. Example: If John does not respond after the greeting repeats the set number of times, the call will be forwarded to the Extension specified here (e.g., Reception or Operator).
Is Voicemail Specify whether the Timeout Destination should direct the call to voicemail. Example: Set to No if the destination is a live Extension. Set to Yes if the call should go to voicemail after the greeting attempts are exhausted.
- Operation Times
Overview
This section allows calls to be redirected to different PBXware destinations based on the time they are received.
Operation Times Enable or disable time-based call redirection.

Options: Yes – Enables operation time settings. No – Disables operation time settings. Inherit – Applies the operation time settings from a higher-level configuration. Example: Select Inherit to use the Operation Times configured at the system or group level, if applicable.
Default Destination Define the PBXware Extension number where calls are routed during non-working (closed) hours. Example: If the office is closed, all incoming calls can be redirected to Extension 1000.
Greeting Select the audio file that will be played to callers during closed hours. Example: A file such as greeting-afterhours.wav may say, "Our office is currently closed. Please leave a message or call back during business hours."
Open Days Specify the days and hours the IVR is considered operational. Calls received during this time will be routed based on the IVR settings configured in the Add/Edit IVR screen. Note: Calls received outside the defined open hours will be routed to the Custom Destination, or if not specified, to the Default Destination (under Closed Dates).
Custom Destinations Set the PBXware destination for calls received during specific times. Example: Calls received from 12 PM to 1 PM (lunch hour) may be redirected to voicemail or a different Extension.
Closed Dates Define specific dates (e.g., holidays) when all calls are considered outside operating hours. Note: If a specific Destination is defined here, it will override the Default Destination.
Important Note: If users manually override the system using access codes *401 (Force Open) or *402 (Force Closed), the Operation Times rules will be bypassed for that day. These rules will resume as normal after midnight.
- Ringing Type
Ringing Type
Select the type of ringing that will be played to the calling party before they enter the IVR.
Example:
Instead of the caller immediately entering the IVR without any feedback, a ring sound or music can be played from the system's Music on Hold (MOH) class to simulate a natural call flow.
Note:
This is a required field and should be configured to enhance caller experience.

Music on Hold Select the MOH (Music on Hold) class that will play to callers after they make a selection in the IVR. Example: Once a caller selects an IVR option (e.g. Sales), the MOH class assigned here will play background music or messages while the system connects the call. Note: This is a required field. MOH classes and their associated audio files can be reviewed and managed under: System → MOH
Custom Ringtone Choose a specific ringtone that will be used when the destination device (defined in the IVR) starts ringing. Example: If the caller selects option '3' and the call is directed to a Linksys phone, this phone can ring using a custom tone like <Simple-2>.
- Local Dialing
Dial Local/Network Destinations
Enable or disable dialing local network Extensions or proper/mobile phone numbers from the IVR.
Example:
If this option is set to Yes, the IVR will permit dialing of local network Extensions only.
Note: Proper/mobile numbers will be restricted from dialing through this IVR.

Fax Dialing Enable fax-to-email functionality when a local Extension is dialed from the IVR. Example: If John accesses the IVR and dials a local Extension (e.g. 1025) while this option is enabled, a fax tone will be generated. The system will then accept the fax and send it to the email address associated with that Extension.
Enable Range Limit Specify whether to limit which Extensions can be dialed based on a defined range. Options: Yes – Only Extensions within the specified range can be dialed No – All Extensions are accessible Not Set – No restriction is applied
Start At Define the beginning of the allowed Extension dialing range. Example: If set to 1000, dialing from the IVR will only be allowed for Extensions beginning at 1000.
End At Define the end of the allowed Extension dialing range. Example: If set to 2000, only Extensions up to and including 2000 will be reachable via the IVR.
Exclude List Specify individual Extensions that should be blocked from dialing, even if they fall within the allowed range. Example: If Extension 1005 is entered here, it will not be reachable from the IVR despite being within the defined range (1000–2000).
- Permissions
Permissions control which users are allowed to access the IVR. This feature is particularly useful for restricting IVR access to specific Extensions, such as requiring valid account numbers, but it can be adapted for other use cases as well.

Account Access Only Enable or disable restricted access to the IVR for specified PBXware Extensions only. Example: If this option is set to Yes, only Extensions listed in the Account List will be permitted to enter the IVR.
Account List Define the list of local Extensions allowed to access the IVR. Example: If John calls the IVR but his Extension number is not included in this list, the call will be transferred to the defined Sales Extension instead. NOTE: This is a required field when Account Access Only is enabled. Extensions must be separated by a single space (e.g. 1001 1002 1003).
Sales Extension Set the Extension number to which callers will be redirected if they are not on the Account List. Example: If John is not authorized to access the IVR, he will be automatically transferred to the Extension defined here (e.g. 1005). NOTE: This is a required field when Account Access Only is enabled.
- Multi-digit IVR Codes
The main distinction between a Standard IVR and a Multi-digit IVR is that the latter accepts two or more digits as input (e.g. numbers from 10 to 100).
While Multi-digit IVR offers greater flexibility and a wider range of options, some advanced features are not available.
Access Code Displays the multi-digit code used to access a specific IVR Destination.
Example: 12345789

Description Provides a brief description or label for the access code.
Example: Test
Destination Specifies the Destination (Extension number, voicemail, etc.) where the call will be redirected after entering the access code. Example: 100
Click the edit button to edit the selected Access Code entry. Click the X button to remove the selected Access Code entry. NOTE: After clicking the delete button, a confirmation prompt will appear: "Are you sure you want to remove XYZ?" - If Cancel is clicked, the action will be aborted. - If OK is clicked, the Access Code will be permanently deleted.
Search
Search Users can locate specific Access Codes by entering text into the search field and pressing the Enter key.
Clicking the Add Access Code button will redirect the user to a configuration section, where all parameters for the new Access Code can be defined.
- Add/Edit Access Code
Access Code Enter the code that users will dial from the Multi-digit IVR to be transferred to a specific PBXware Destination.
Description Provide a short label or note describing the Access Code and its associated Destination. This field is for administrative reference only.
Example: This code sends callers to Sales (Ext. 1000) NOTE: This is a required field, visible only to administrators.

Destination Choose the PBXware Destination where the call will be routed when the Access Code is dialed. Example: John enters the Multi-digit IVR and dials 99. If this Access Code is configured to transfer to Extension 1000, the call will be routed there.
- PIN-Based IVR
PIN-based IVR allows dialing local or remote Destinations by providing a pre-set IVR PIN number.
This IVR type is commonly used for temporary cases where access control is needed only for a limited time.
PINs can have an expiration date, after which they are no longer valid.
NOTE: PIN-based IVRs do not support some of the advanced features available in other IVR types.
PIN Displays the IVR PIN number that users must enter to proceed.

Description Displays a short label to describe the purpose or use of the PIN.
Expiry Date Displays the date when the PIN will no longer be valid. TIP: If the PIN entry is grayed out and the Expiry Date is underlined, it means the PIN has expired.
Destination Displays the PBXware Destination to which the call will be routed after the correct PIN is entered.
Click the edit button to edit the existing PIN configuration.
Click the X button to delete an existing PIN.
NOTE: Upon clicking the delete button, a warning message will appear: "Are you sure you want to remove XYZ?" If the user clicks Cancel, the action will be aborted. If OK is clicked, the selected PIN will be permanently removed.
Bulk Uploading PINs Click this button to upload a CSV file containing multiple PINs and Destination codes at once.
Steps: Click the Browse button to locate your .csv file. Click Upload to add the PINs from your file to PBX.
- Add/Edit PIN
PIN
Define a unique PIN number that will be requested during the IVR process.
John dials the local IVR '1003' and is prompted to provide a PIN. After entering 1234, PBX will dial the number specified in the 'Destination' field.
NOTE: This is a required field, and the PIN entered here should be provided when requested by the IVR.

Description Enter a short description of the PIN for easy identification. Example: John's Mobile Number or Test NOTE: This is a required field and helps describe the purpose of the 'Destination' number.
Expiry Date Define the date until which the PIN will be valid. Once expired, the PIN will no longer function. NOTE: This is not a required field, but users are strongly encouraged to set an expiry date by clicking the 'Calendar' icon and selecting the date, or manually entering it in the 'dd-mm-yyyy' format.
Destination Select a destination from the drop-down menu to be dialed once the correct IVR PIN is entered.
- IVR Tree
An IVR Tree is a more graphically oriented version of an IVR, offering a visual representation of the IVR's structure.

Once the Create button is clicked, users will be prompted to enter an IVR name and Extension. After that, the IVR will be available for further editing.
After an IVR Tree is created, users can select it from the drop-down menu and click the Edit button to continue configuring it.
IVR Tree Actions
Name Enter the IVR name.
Extension Enter the IVR Extension number.
Number of Rings Define the number of rings before the caller enters the IVR.
Response Timeout (sec) Define the time period in seconds during which an IVR option must be dialed by the user.
Digit Timeout (sec) Define the timeout in seconds during which a new digit must be dialed. NOTE: This option is useful when 'Local dialing' is turned on.
Selection Timeout (sec) Define the timeout in seconds during which the selection must be made.
Direct Access If ticked, this option disables direct access to this IVR, meaning that the IVR can only be accessed through another IVR.
Local Dialing Enables the user to dial local Extensions while inside the IVR. The other two options in the menu are as follows: Delete: Click this button to delete the selected IVR. Save: Click this button to save the changes. NOTE: The 'Save' button must be clicked after every change for it to be applied.
- IVR Tree
The main part of the IVR Tree consists of 'Actions' and 'Selections'. These can be added by clicking the plus icon and deleted by clicking the Delete button next to it. Actions will be executed in the order they are placed on the list.

When 'Action' is selected in the IVR Tree section, users can add the following actions:
Dial Local Extension: Dial a local Extension set in the 'Extension' field. Dial Remote Extension: Dial a remote Extension set in the 'Destination' field. Dial Voicemail: Leave a voicemail for the given Extension. Check Voicemail: Check voicemail for the provided Extension. Go to Context: Move to the given 'Context' and 'Extension', e.g., 'Context' -> 'time', 'Extension' -> '222'. Start Recording: Start recording the conversation. If 'Silent recording' is ticked, the user won't hear an announcement. Set Queue Priority: Set the priority when entering a Queue. Set Language: Set the language used in the IVR. Use two-letter notation, e.g., 'us'. Play Sound: Play a sound file. You can select the language for the file and enable DTMF tones or keypad input. Change CallerID: Change the user's CallerID. Wait: Wait for a given number of seconds before proceeding. Busy Signal: Play a busy sound to the caller. Hangup: End the current call. When 'Selection' is chosen, users can add various selections, such as 'Selection 0' to 'Selection *', along with 'Invalid Selection' or 'Timeout Selection'.

Once a selection is made, the following destination types can be selected: Go to IVR Tree Local Destination Remote Destination Voicemail Ring Group Queue IVR
Destination Select the PBX Destination applicable to the selected destination type. Example: If 'Go to IVR Tree' is selected as a 'Destination', select the applicable IVR Tree number. For 'Invalid Selection' or 'Timeout Selection', the configuration will differ as shown in the screenshots.

Invalid Selection Sound File: Select the sound file to play when an invalid selection is made.
Timeout Selection Sound File: Select a sound file for when the timeout selection is reached.
Destination: Select the appropriate PBXware Destination, such as 'Go to IVR Tree', and select the applicable IVR Tree number.
- IVR Tree Graph
Once the IVR Tree is created, users can click the IVR Tree Graph in the sidebar to view a graphical representation of the IVR Tree.

Dial Groups
- Dial Groups
Dial Groups are used to group multiple UADs/Phones into a single network Destination. Each Dial Group is assigned a group number which, when dialed, rings all Extensions assigned to that group simultaneously.
Search: The search bar allows administrators to quickly filter a large number of Dial Groups by entering the group’s name or number. Simply begin typing the group name or group number, and the list will automatically update to show matching results.
Group Name: Displays the name assigned to the Dial Group.
Group Number: The Extension number associated with the Dial Group. Once dialed, all Destinations assigned to the group will ring.
Destinations: Extension numbers assigned to a Dial Group. All listed Destinations will ring simultaneously when the group number is dialed.
Last Destination: The final fallback Extension to be called if none of the Destination Extensions answer.
Edit: Click the Edit icon to modify the Dial Group configuration.
Delete: Click the Delete icon to permanently remove a Dial Group from the system.
- Add/Edit Dial Group
Clicking on the Add Dial Group or Edit button will open the following configuration options: Dial Group Name: Set a name for the Dial Group.
Dial Group Number: Set the number that will be dialed to reach this Dial Group.
Destinations: List the Extension numbers to be associated with the Dial Group, separated by commas. All listed Extensions will ring simultaneously.
NOTE: If all Destinations fail after timeout, the Last Destination will be called.
Incoming Limit (per call): Set the number of times a single call can enter this Dial Group. This prevents call loopbacks between groups.
NOTICE: System-wide limitation for these loops is 10.
- Advanced Options
These options fine-tune Dial Group behavior and call handling.
Greeting Sound file played to callers when the Dial Group is dialed.
Answer on undefined greeting If enabled, the Dial Group will not answer until a proper greeting is selected.
Timeout Message Sound file played to the caller if no extensions answer. Must begin with announce-.
Loops Number of times to repeat ringing all extensions if there is no answer.
Looping Mode Defines how the call cycles through extensions:
Per Extension: An extension rings multiple times before moving to the next.
Circular: Each extension rings once per loop.
Timeout (sec) Duration all extensions ring before a timeout occurs.
Force Dial Group Timeout If enabled, the Dial Group timeout takes priority over individual extension timeouts.
Dial Options Additional call settings like music on hold, set using specific syntax (e.g., m(default)).
Store Unanswered CDRs Controls whether unanswered call records are stored in call reports.
Ring Strategy Defines how the system rings extensions:
All Least recent Round Round Memory
Note: Maximum of 30 extensions can be dialed simultaneously when using the ‘All’ strategy.
Custom Ringtone Set a custom ringtone for phones in this Dial Group.
Replace Caller ID Overrides the Caller ID for incoming calls to the Dial Group. Supports variables like %CALLERID% and %CALLERIDNUM%.
Call Rating Extension Assigns a billing extension for all outbound call expenses from this Dial Group.
Local Destinations PBD Skip (6.6.1) If enabled, PBD PIN is skipped only if all destinations are considered local.
Disable Member Enhanced Services (6.7.3) If enabled, Enhanced Services on member extensions may not apply to ERG-passed calls.
Use Original Caller ID for External Calls (6.6.1) If enabled, preserves the original Caller ID for external dialing.

- Operation Times
This section defines the operational hours during which the system is considered open or closed. Based on these hours, incoming calls can be automatically redirected to different PBXware destinations.
Uploading and Downloading Configuration
Administrators can manage operation time settings using CSV files. The "CSV Upload" button allows for the import of configuration data, while the "CSV Download" option exports the current configuration for review or backup purposes.
Activation
Operation Times functionality can be enabled or disabled. Additionally, there is an "Inherit" option, which applies operation time settings from a higher-level entity, such as the server or tenant, allowing for streamlined configuration across multiple instances. This option simplifies management by reusing centralized settings instead of requiring individual configuration at every level.
Default Destination Handling
If a call is received outside of configured operational hours and goes unanswered by the dial group, the system redirects the call to a predefined destination. An optional voicemail setting can redirect calls directly to voicemail instead of ringing the extension.
Greeting Behavior
During closed periods, a designated greeting sound file can be played to inform callers of the closure or provide further instructions. This file can be customized as needed.
Advanced Options
Closed Dates: Specific dates (e.g., holidays) can be defined as exceptions during which all incoming calls are redirected. If a custom destination is defined for a specific date, the call is sent there instead of the general default destination.
Custom Destinations: Calls received during non-working periods (e.g., weekends) can be routed to a specific PBXware MT extension provided in the configuration.
Open Dates: Define standard business hours during which calls should be handled as normal. Any call received outside these time ranges is automatically redirected according to the set rules.
- Recording
This section controls the call recording functionality for the system.
The call recording service can be enabled to automatically record all incoming and outgoing calls associated with the dial group. When using call recording across many extensions, it's important to monitor disk usage periodically to ensure sufficient storage is available.
Administrators may choose whether or not to notify call participants that the call is being recorded. When the silent mode is disabled, a message such as “This call is being recorded” will be played at the beginning of the conversation.
For reference, recording file sizes vary based on the selected audio format and recording content. On average, a 60-second audio recording uses the following disk space:
WAV49: ~84 KB
WAV: ~830 KB
GSM: ~84 KB
These values can vary slightly depending on audio content and silence levels.
- Exit Digit
The Exit Digit feature allows callers to manually transfer their call while waiting in a dial group. When the configured digit is pressed during ringing, the call is immediately redirected to the designated Exit Destination, which must be an extension within the PBX system. This enables callers to bypass the ring group if they know where they want to be routed.
A drop-down menu is available for selecting the Exit Destination.
The Last Destination
The Last Destination is used when none of the extensions in the dial group answer the call. After the timeout or configured looping ends, the system transfers the call to this fallback extension.
You may also choose whether this fallback destination should redirect the call to a voicemail box instead of a standard extension.
- Incoming Call Confirmation
Incoming Call Confirmation allows the system to prompt the dialed extension to confirm whether they want to accept or reject a call from the dial group. When enabled, the recipient is asked to acknowledge the call before it is connected.
You can specify a custom confirmation message to be played to the recipient. This message should be a sound file that begins with the prefix rg-announce-.
Additionally, a call answered message can be configured to play if the recipient attempts to accept the call after it has already been answered by another extension. Custom sound files for this scenario should begin with the prefix rg-late-announce-.

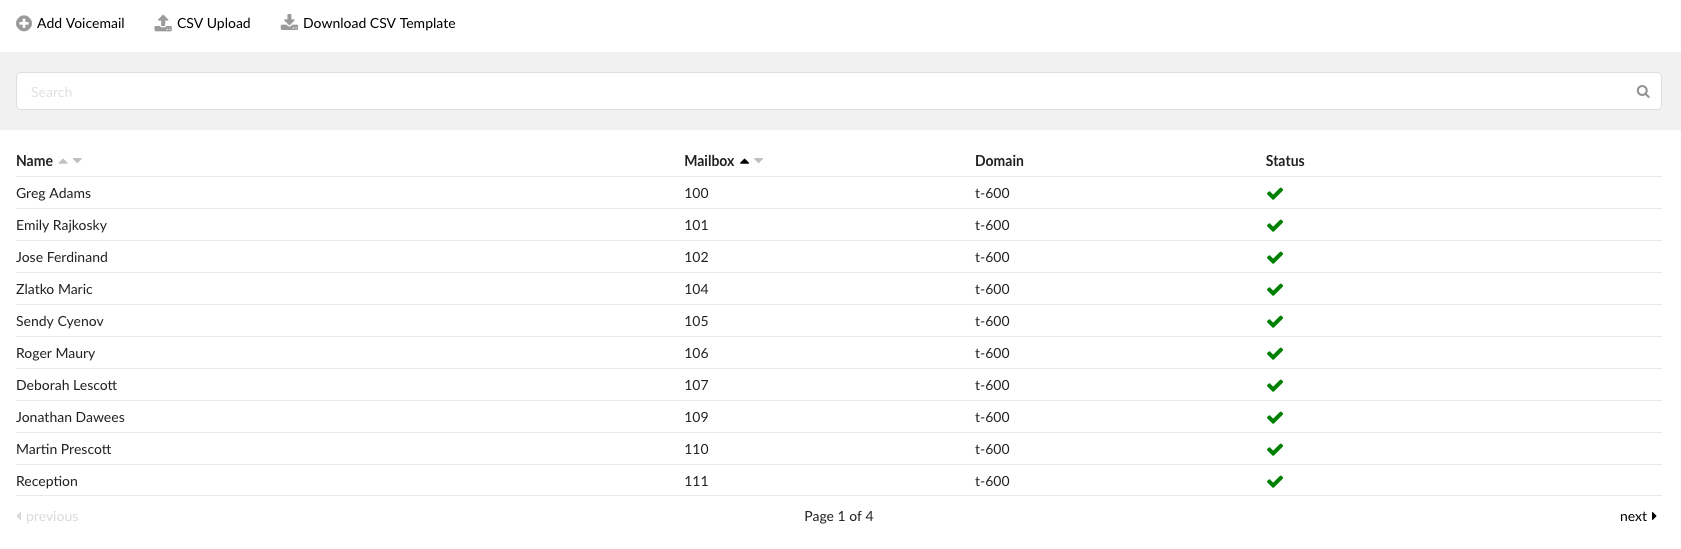
Voicemail
- Mailboxes Overview
Each extension has its own voicemail, or standalone mailboxes can be created.
Found on Slave Tenant only.
- Lockout Feature
After failed PIN attempts (e.g., 3), the mailbox is blocked until manually unblocked.
Mailbox Details Displayed:
Name – Full name of the user.
Mailbox – Mailbox number (extension).
Domain – Context the mailbox belongs to.
Functions:
Edit – Modify configuration (not for system extensions).
Delete – Remove mailbox.
Transfer to voicemail between tenants – Dial *125XXXYYY (XXX = tenant, YYY = ext).

- Accessing Voicemail
From Any Extension:
Dial *124
Enter the Mailbox Number
Enter the PIN
Voicemail Menu Options:
Press 1 – New/Old messages
Press 2 – Change folders (New, Old, Work, Family, Friends)
Press 3 – Advanced Options
Press 0 – Mailbox Options (Record greetings, change password, etc.)
Press * – Help
Press # – Exit
- Search Mailboxes
Search by: name, number, or email.
- CSV Uploads
Upload CSV to add mailboxes quickly.
Format: Mailbox number,Name, PIN, Email
Template available for download.
- Add/Edit Voicemail Mailbox
Required Fields:
Mailbox – Unique number (e.g., 5001)
Name – Full user name
PIN – 4-digit authentication code
Email – For voicemail notifications
Optional/Advanced Settings:
Password – For OSC login (must meet complexity requirements)
Language – For voicemail prompts
Send Email – Enable/disable email alerts
Transcribe Content – Enable transcription to text
Carbon Copy/Pager Email – Additional notification addresses
Greeting Message – Plays before recording
Skip Instructions – Skip “how to leave a message” prompts
Attach – Send voicemail as audio attachment
Delete After Emailing – Delete message post-email
Say Caller ID – Announce caller's number
Allow Review Mode – Let callers replay/edit message before saving
Allow Operator – Press 0 to reach operator
Operator Extension – Extension to connect to if 0 is pressed
Play Envelope Message – Announces date/time of message
Hide From Directory – Hides this extension from directories
Rings to Answer – Number of rings before voicemail starts
Voicemail Delay – Time delay before greeting plays
Timezone – For timestamp display
Allow OSC Access – Allow specified extensions to access this mailbox
Call Notifications

- Enable
Enables call notification feature.
Notify Destinations Settings:
Notify Destinations – Extensions to call upon new voicemail
Ring Type – ALL or SINGLE
Ring Time – How long each extension rings (default: 32s)
Retry Count – Number of retry attempts (default: 0)
Retry Delay – Time between retries (default: 1 min)
Retry if Not Accepted – Keeps retrying until user listens to voicemail (via IVR)
- Voicemail Groups
Voicemail Group Details:
Group Name – Name/label for the group
Group Number – Number to leave group voicemails
Mailboxes – List of assigned mailboxes (comma-separated)
Greeting – Played before message is recorded (must start with 'vm-greeting')
Incoming Limit – Limits call loop entries to avoid infinite voicemail loops
- Managing Messages
Message List Options:
Move – Move to another folder
Forward – Send to another extension
Listen – Play message in-browser
Download – Save message as file
Delete – Remove message
File Renaming
Deleted messages trigger re-sequencing (e.g. msg0004 becomes msg0003)
- Search Voicemails
Use drop-down to filter by Mailbox.
Filter messages by folder (e.g., New, Old).
- Voicemail Options Menu (In-App)
Move – Sort messages into folders
Forward – Send message to another mailbox
Listen – Stream message
Download – Export as file
Delete – Remove from system
Monitoring
Monitoring Extensions This section shows all active extensions in real time, with key details and controls.

Displayed Extension Details:
Select All: Check this box to select all online devices at once
Name: User’s name (e.g., Peter Doyle)
Extension: Shows the protocol and extension number (e.g., SIP/2002)
IP Address: Device IP and port (e.g., 192.168.1.1:5060)
Clicking the IP opens the phone’s web interface (if supported)
Status: Device status — Online or Offline
User Agent: Phone model and firmware version (e.g., Yealink SIP-T41S)
DND: Shows if Do Not Disturb is enabled
On Call: Shows a headset icon if the user is currently on a call
You can take actions like transferring or hanging up calls directly from here.
Search and Refresh Options (Extensions):
Refresh: Set how often the list updates (e.g., every 10 seconds)
Status: Filter by All, Online, or Offline
Search: Filter by Name, Extension number, User Agent, or IP Address
Actions (Extensions):
Transfer: Move a live call to another extension
Example: Transfer a call from Extension 1001 to 1005
Hangup: End the selected call
Reboot: Reboot the device (may require provisioning to work)
Monitoring Apps This view shows only extensions using CommunicatorGO or other supported apps, updated in real time.

Displayed App Details:
Name: Name of the user/extension
Extension: Protocol and extension number
IP Address: IP and port the app is connected from
App: App name and version
Edition: Type of app (Business, Mobile, etc.)
On Call: A headset icon appears if the user is currently on a call
Call actions like transfer and hangup are available here as well.
Search and Refresh Options (Apps):
Refresh: Choose how often to refresh data
Edition: Filter by app edition
Search: Filter by Name, Extension, or App
Actions (Apps):
Transfer: Move the active app call to another destination
Hangup: End the current app-based call
Live Calls Shows all active calls happening in real time.

Live Call Info:
From: Extension name and number of the caller
To: Extension name and number of the receiver
Call Duration: How long the call has been ongoing
Search and Refresh Options (Live Calls):
Refresh: Set how often data refreshes
Hangup: End a selected live call
Reports
CDR (Call Detail Records) This section shows detailed information about all calls made through PBXware MT. You can search, filter, and interact with live call data.

Call Details
Tenant: Shows which tenant the call was made from (e.g., 300)
From: Extension that made the call (e.g., 1001)
To: Extension that received the call (e.g., 1004)
Date/Time: When the call happened
Duration: Call length in hh:mm:ss format
Call Rating: Time that was billed
Cost: Total price of the call
Status: Call result – Answered, Not Answered, Busy, or Error
Caller ID: The caller ID used on outbound calls
Recording Icon: Appears if the call was recorded and recording features are enabled
Recording Playback Recordings may be stored locally or remotely.

Standard Icon: File is accessible and can be deleted locally
Service Icon: File is stored remotely and cannot be deleted
Supported storage services:
Amazon S3
FTP / SFTP
Google Drive
Microsoft OneDrive
Dropbox
Icons only show if a recording exists. You must have the correct license.
Search & Filter Options
Date Range: Choose dates to search within
From/To: Filter by extension or trunk
Status: Filter calls by result
ID: Toggle between Unique ID and Linked ID to trace call chains
Tenant: Filter by tenant
Show Rated Calls Only: Show only billed calls
Show Recorded Calls Only: Show only calls that were recorded
Search Field: Enter keywords like IP, extension, or device name

Actions
Listen: Play or download a recording
Call: Start a test call between two extensions
Caller: Who made the call
Destination: Who received the call
Print: Print selected call records
Email: Send the current view or selected records via email
Download CSV: Export results to a .csv file
Delete Recording: Remove the call recording (if allowed)
CLIR (Command Line Interface Record) Shows detailed technical call logs for support and troubleshooting. Also includes license warnings for channel limits.
Email CLIR: Send logs to an email address
View CLIR: Opens call log details in a popup
Auto Provisioning This page logs all provisioning requests made by devices (UADs).
Log Columns:
Tenant: Tenant the request came from (if unknown, shows “–”)
Date: Time of the request
User Agent: Device information
IP Address: IP address and country (if detected)
MAC Address: Unique ID of the phone
Protocol: HTTP, HTTPS, or TFTP
URI: Path requested
Status: HTTP response code (e.g., 200 = OK)
Message: Description of the status
Filtering Options:
Filter by Tenant, Date, Protocol, or Status
Use the Search Input to search by IP, MAC, User Agent, or URI

Statistics
GranSun PBX Statistics Module: Training Guide
Overview The Statistics module shows detailed call data. Admins can use it to review call counts, durations, and trends.

Accessing the Statistics Module Go to the Statistics section in the GranSun PBX interface.
Using the Daily Statistics View The Daily tab shows:
Total number of calls per day
Average call duration
Graphs showing call activity

Steps: Choose a Date Range using presets like:
Today
Yesterday
Last 7 Days
Last 30 Days
This Month

Apply Filters (Optional) You can narrow results by using filters:
From: Show calls from specific numbers
To: Show calls to specific numbers
CallerID: Filter by caller ID
Trunk: Filter by trunk name
Filter match types:
Equals: Exact match
Begins with: Starts with specific digits
Contains: Includes certain characters
Ends with: Ends in specific digits
Example: To find calls starting with 101, set From to Begins with and enter 101.
Understanding the Results After filters are applied, the system shows:
Total Calls: How many matched
Average Duration: Average call length
Graphs: Visuals showing call trends over time

Advanced Options Click Show Advanced Options to unlock more filters:
Filter by CallerID
Filter by Trunk

Exporting Data Use the Export button to download results for reports or analysis.
Tips for Best Use
Use Multiple Filters: Combine filters for more specific results
Check Regularly: Monitor statistics often to spot issues early
Respect Privacy: Follow data privacy laws when handling call records

Conference
GranSun PBX – How to Set Up a Conference
View Existing Conferences Go to the Conferences section to see a list of all current conference rooms.
You can Edit or Delete any listed conference.

Search for a Conference Click Search and type in the Name or Number of the conference.

Add a New Conference Click Add Conference and fill in the required fields:
Conference Name (e.g., “Sales Team”)
Conference Number (e.g., “2255” – this is the dial-in number)
Conference Group (optional – select if you’ve already created one)

Set Advanced Options (Optional but Recommended) Click Advanced Options to fine-tune the conference settings:
Max Users: Limit number of attendees
Conference PIN: Require a PIN for access
Admin PIN: Allows specific users to control the conference
Marked User PIN: Marks a user as a “leader” with special rights
Language: Pick announcement language (default is English)
Rings to Answer: Delay before joining starts
RTP Delay: Small audio delay (1–3 sec) to prevent cut-off greetings
Color: Set a color label in the CommunicatorGO app
Send Email After Conference: Automatically email the recording
Notification Email: Where the recording is sent
Note: "Auto MP3 Conversion" must be enabled for emailed recordings to work.

Create a Conference Group (Optional) To set up user permissions:
Go to: Conferences → Groups
Click Add Conference Group
Enter:
Group Name (e.g., “Managers”)
Users (add extension numbers like 101, 102)

Conference Options You Can Enable (Checkbox Settings)
Announce User Join/Leave: Play names when users enter or exit
Quiet Mode: No sounds when users join or leave
Record Conference: Automatically save a recording
Enable Music on Hold: Play music while waiting
Present Menu: Press * in the conference for menu options
Announce Number of Participants: Say the count of people in the room
Close Conference When Last Marked User Leaves: Ends the call when the leader leaves
Wait for Marked User Before Talking: Others can’t speak until the leader joins
Mute External Callers on Join: Automatically mute outside callers

Manage User Access
To allow all users, check Enable All Users
To limit access, choose specific extensions from the dropdown and click + to add them

Set Up and Manage Meetings
PBXware 7 MT – How to Set Up and Manage Meetings (Simplified)
Access Meetings
Choose the Tenant first
Click on Meetings in the side menu
Note: Meetings can only be managed in Slave Tenants

Create a Meeting
Go to: Home → Meetings → Create Meeting Fill out the required fields:
Meeting Name
Date and Time (must be in the future)
Time Zone
Organizer (select an extension)
Optional settings:
Description
Duration
Public or Private
Recurrence (Daily, Weekly, Monthly, or None)
Click Save to create the meeting

Add Participants
After creating the meeting:
Click Manage Participants
Select extensions to invite
Click + to add them
Note: The organizer cannot be removed

Assign Co-Organizers
To promote someone:
Click + next to their name
To remove co-organizer status, click –

Understand Recurrence Options (Optional)
Daily: Repeat every 1 to 90 days
Weekly: Repeat every 1 to 12 weeks, choose weekdays
Monthly: Repeat by specific date (e.g., 20th) or by day (e.g., 2nd Monday)
No Recurrence: One-time meeting only

View Meetings
Scheduled: See upcoming meetings
Recent: View past meetings
Date Range: Filter meetings between selected dates

Fax Management
PBXware Fax - Step-by-Step Guide
Viewing Faxes
Received Faxes: Go to the Received section to view incoming faxes. You’ll see:
Sender (RSID) and Caller ID
Destination (email or extension)
Date/Time, Pages, and File Size
Actions:
Download the fax as a PDF or TIFF
Delete any unneeded faxes
Sent Faxes: Go to the Sent section to view outgoing faxes. You’ll see:
Sender Extension and Destination Number
Pages Sent, Status (Success/Fail), and Date/Time
Actions:
Download as PDF or TIFF
Delete if needed
Tip: Icons show if the fax was sent locally or to a remote destination.

Configuring a Cover Page
Steps:
Go to Cover Page Settings
Set up:
Page Size: A4, Legal, or Letter
Company Name: Will appear on the cover page
Company Logo: Upload a JPEG file
Language: Choose if more than one is available
Use the PDF Preview to check how the cover looks

Managing Caller IDs for Fax
Steps:
Go to the Caller IDs section
Options:
Add manually or Upload a CSV (format: CallerID,Label)
Edit or Delete existing Caller IDs
Search for specific Caller IDs
Download CSV Template to help with setup
Caller IDs let users choose which number shows when sending a fax through CommunicatorGO.

Fax System Settings
Adjust how faxing works on the system:
Modems: Choose supported modem types
Min/Max Rate (bps): Set how fast faxes are sent
ECM (Error Correction Mode): Turn on for automatic error fixing

E-mail to Fax (Sending Faxes via E-mail)
Steps:
Turn the feature on in Settings
Set up Authentication:
Basic (standard login)
OAuth (Google or Microsoft)
Fill in Server Info:
IMAP Host, Port, Encryption Type, Username, Password
Set the Mailbox (default is INBOX)
Choose a Caller ID
Configure Retries & Timeouts:
Max Retries: Number of times it tries to send
Requeue Timeout: Delay before retry
Important Rules:
Email Subject = fax number (e.g., 032445231)
Attachment must be a PDF
Max Attachments = 5
Any non-PDF attachment will be ignored

E-mail Notifications (Optional)
Enable email alerts for fax success or failure
Set a From Address
Customize templates under: Settings → Email Templates → Email to Fax
Trunks for E-mail to Fax
Choose a Primary, Secondary, and Tertiary trunk just for sending faxes via email
E-mail Whitelist
Control who is allowed to send faxes by email:
Add specific email addresses
Add full domains (e.g., @gmail.com)
Or allow all
Tip: Use @domain.com to approve everyone from that domain

Routes
Step-by-Step Guide to GranSun PBX Routes
Accessing the Routes Section This is where you define how calls are routed based on number patterns or destinations.
Navigate to: Settings → Tenants → Master Tenant → General Settings → Routing Mode
Routing Modes Available:
E.164 Routing Mode: Uses international phone number format (E.164)
Simple Routing Mode: Uses flexible dialing patterns, not restricted to international format

E.164 Routing Mode This mode uses the global E.164 format for all phone number destinations.
a. Managing the Daemon Database
Update Daemon Database: Refreshes stored destination data
Import Database: Pull updated destination info from a central source using an Import URL
Export Database: Save and export the current destination data
Tip: Update and import regularly during maintenance. Report unreachable numbers to your admin.
b. Viewing and Managing Routes
Routes are listed alphabetically. Click a letter to browse destinations starting with it
Destination Groups include:
Special Service
48 States
Toll Free
Alaska
Hawaii
Use Show Hidden Groups to see groups that are normally hidden
c. Adding or Editing Destinations
Destination Name: A label for the route (e.g., “All proper destinations”)
Destination Code: Numeric code (e.g., 442 for UK numbers)
Route: Pick which country or group this belongs to
Destination Type: Group it into types like “Proper” or specific carriers like “O2”

Simple Routing Mode Offers more flexible routing using digit patterns instead of international formats.

a. Adding or Editing Routes
Route Name: Name the route (e.g., “Mobile”)
Start Digits: The first few digits that trigger this route (e.g., “06”)
Required Length: Total number of digits expected in the full number (e.g., “9”)
Required Regex: (Optional) Add a regular expression for finer control (e.g., “06[1-5]”)
Prefix: A number to add before the dialed number (e.g., “0044”)
Strip Start Digits: Choose whether to remove the start digits (Yes/No)
b. Operation Times
Enable Operation Times to manage business hours
PIN: Require a PIN for calls during these times
Greeting: Play an audio message when calls come in outside open hours
Open Days: Set normal working hours
Closed Dates: Define full-day closures with alternate routing

Special Routes Use special routes for calls like emergency numbers or internal services.

Name: Name for the special route (e.g., “Test”)
Number: The exact number for the route (e.g., “80”)
Destination Type: Select what kind of target this number goes to (e.g., Trunk)
Destination: Pick the final route destination (e.g., “Alaska”)
Type: Category like “Info Service”
Old special routes will be automatically updated to the new format.

Destination Groups These group destinations by country, service type, or carrier.
Destination Group: Name the group (e.g., “48 States”)
Add/Edit: Create or change groups
You can only delete a group if it's not assigned to any route

Disabled Routes Use this to block calls to certain numbers or patterns.
List the numbers one per line
To block patterns using regular expressions, add an underscore (e.g., _001[2-9])

Least Cost Routing (LCR)
Step-by-Step Guide to Cost Routing (LCR) in GranSun PBX
Accessing the LCR Section LCR helps you choose the cheapest and most reliable way to route calls through your available trunks.
Navigate to: System → LCR

Understanding LCR Configuration
System Default LCR: On each tenant, you can choose to use the Master Tenant's default LCR settings.
If Use System Default LCR = On, tenant settings are ignored
If Off, the tenant can have its own custom LCR setup
Configuring Routes
Routes: All possible destinations are listed in alphabetical order. Click a letter to view routes that start with that letter
Destination Groups: Categories for destinations (like):
Special Service
48 States
Toll Free
Alaska
Hawaii
Assigning Trunks to Routes
For each destination, you can assign up to three trunks:
Primary Trunk: Used first
Secondary Trunk: Used if the primary fails
Tertiary Trunk: Used if both primary and secondary fail
This helps ensure calls go through even if one trunk is down or unreachable.
Uploading and Downloading Rates
CSV Upload: You can bulk upload destination group rates with a CSV in this format:
"Code","Route","Destination","Outbound","Inbound","Inclusive","Call Rating","Minimum Charge","Connection Charge"
CSV Download: Export the current rate list for review or backup
Download CSV Template: Download a sample file with the correct headers to help you build your own
Managing Destination Groups
Each country or region can have multiple Destination Groups (linked to different providers).
You can add or edit these groups as needed
You can only delete a group if it isn’t assigned to any route
Disabling Specific Routes
To block calls to certain destinations:
Add them to the Disabled Routes list
List each number or route on a new line
Use regular expressions by starting the line with an underscore (_)
Example: _1900.* to block all premium-rate numbers starting with 1900
Service Plans
Step-by-Step Guide to Service Plans in GranSun PBX
Accessing Service Plans Service Plans help define how calls are billed and what features are included for each extension.
Navigate to: System → Service Plans
Service Plans are optional, but they help improve user experience by applying preset settings and rates to extensions.

Creating or Editing a Service Plan When you add or change a service plan, you can set the following options:
Service Plan Name: Give the plan a unique name (e.g., “Euro”)
Time Based Dialing (TBD): Charge different rates depending on the time or day (like weekends vs. weekdays)
Minimum Charge: The smallest amount charged per call (applies after any grace period)
Connection Charge: A one-time fee applied when a call connects
Connection Charge per Destination Group: Choose whether charges vary by call destination
Total Inclusive Minutes: Set how many free minutes each user gets with this plan
Grace Period (sec): Calls shorter than this won’t be charged
Call Rating Increment: Choose how to count call time:
MINIMUM_CHARGED: Charge a set amount of time no matter how short the call is
CHARGE_EVERY_$_SECONDS: Charge in steps after an initial period (e.g., “30/6” means first 30 seconds are charged, then every 6 seconds after)

Managing Rates Rates control how much calls cost depending on where they go. These can be managed manually or uploaded.
In E.164 Routing Mode:
CSV Upload: Upload a file with destination rates. Format:
"Code","Route","Destination","Outbound","Inbound","Inclusive","Call Rating","Minimum Charge","Connection Charge" Download CSV: Export the current rates
Download CSV Template: Get a blank template to help build your rate list
Routes: Browse and edit destination group charges alphabetically
If Time Based Dialing is used, you must enter rates for all time-based rules too.

Applying Service Plans to Extensions Assign a service plan to an extension to automatically apply all settings and rates.
Inclusive Minutes Reset: Pick when free minutes reset (monthly, etc.)
Limits and Notifications:
Enable Limits: Turn on usage limits
Soft Limit: Sends a warning email when nearing the limit
Hard Limit: Blocks calls if the limit is passed
Notification Email: Where limit warnings should be sent
These settings help prevent overuse and surprise charges.
Apps
Step-by-Step Guide to the Apps Section in GranSun PBX
Accessing the Apps Section This section manages app permissions and settings for CommunicatorGO (also called gloCOM) for each user.
Navigate to: Master Tenant → Apps

Overview Tab Shows all extensions and which version of CommunicatorGO (gloCOM) each one is using.
What you can do:
Download CSV: Export a list of users and their assigned apps
Manage Editions: Change or review which version of the app is given to each extension
Tip: By default, all editions might be available. It's a good idea to limit them based on what the user needs to save licenses.
Templates Tab Lets you set app permissions for entire departments at once.
Steps:
Select Department
Assign Editions: Pick which versions (Business, Mobile, etc.) users in that department can use
Assign Modules: Choose extra tools like CRM if needed
Save Settings
Important: If you change a single user’s settings manually, they won’t follow the department’s template anymore—unless you reapply it using Batch Mode.

Batch Mode Tab Use this to update many extensions at the same time—either using templates or custom settings.
Best for:
Reapplying department templates
Manually assigning specific editions to selected extensions
Steps:
Use Department Templates (optional): Check if you want to reapply templates
Select Extensions: Choose who you want to update
Assign Editions and Modules: If not using templates, choose manually
Save Settings
Uncheck “Use Department Templates” if you want to give custom settings instead.

Devices Tab Shows all devices registered with CommunicatorGO (gloCOM).
Information shown:
Extension: Number and user name
Platform: Device type (e.g., iOS, Android)
Last Update: Last time the device checked in
App ID: Unique app ID
Version: App version
Public Key: Shows if a security key is linked
Use the search to filter by extension, platform, or app version.

Permissions Tab Lets you decide which features each version of the app can use.
Steps:
Select Edition (Business, Supervisor, Office, Mobile)
Set Permissions: Turn on/off features like Chat, Voicemail, Directory, etc.
Save Settings
You can customize features based on different job roles or needs.

Custom Statuses Create your own presence statuses (like "Busy" or "Away") with custom messages.

Steps:
Enable Custom Statuses
Define Status Type: Choose Available, Busy, Do Not Disturb, or Away
Customize Message: Add a message like “Busy - In a meeting until 3 PM”
Save Settings
These statuses help coworkers know what you’re doing and when you’re free.

Trunks
Step-by-Step Guide to Trunks in GranSun PBX
Accessing the Trunks Section This is where you manage the phone lines (called trunks) that connect your PBX to outside providers.
Navigate to: Master Tenant → Home → Trunks

Understanding the Trunks List When you open the Trunks section, you’ll see a list of all existing trunks with these details:
Name: The name or IP of the trunk
Provider: Template used for the trunk
Channels: Number of calls allowed in and out (e.g., 10/10)
Trunk Type: PSTN or VoIP
Protocol: Type of connection (e.g., SIP or IAX)
Edit/Delete: Options to change or remove the trunk
Use the search bar to quickly find a trunk by name or provider.

Adding or Editing a Trunk
a. Initial Setup
Provider: Choose from your saved templates (set these in Settings → Providers)
Device: Choose a device if required (e.g., T100)
b. General Settings
Name or Number: Give the trunk a name (some providers want it to match your DID)
Country: Choose where your provider is based
c. Authentication
Peer Host: IP of the provider you’re connecting to
Username/Password: Login credentials for the trunk

Advanced Options
a. General Settings
User Type:
User: Only receives calls
Peer: Only makes calls
Friend: Can do both
DTMF Mode: How button tones are sent (RFC2833 is usually best)
Context: Usually matches the trunk name
Status: Set to Active, Not Active, or Suspended
Qualify: Sends a "ping" to check if the trunk is online
Dialing Codes:
National: Local code (e.g., 1 for US)
International: Prefix like 011
E164 Accepted: Enable if using full international numbers
Pass-thru Mode: Skip number formatting
b. Caller ID Settings
Trust Remote-Party-ID: Use caller ID sent from the provider
Send Remote-Party-ID: Send this info with calls
Privacy for PAI Header: Set how much caller ID info is shown
Outbound Caller ID: Default number shown on outgoing calls
Allow ES Caller ID: Let extensions send their own caller ID
c. Channels
Incoming/Outgoing Limit: Max calls allowed
Ringtime: How long to ring before giving up
Email on Exceeded Limit: Get notified when call limits are hit
Outgoing Dial Options: Add advanced dial settings
d. Codecs
Preferred Codecs: Choose which audio types to use (e.g., G.711, G.729)
Ptime: Time between voice packets
Video Support: Turn on for video calls
Auto-Framing: Let the system match the provider’s settings
e. Additional Configurations
SIP Custom Headers: Add special SIP info if needed
Test Number: Add a number to quickly test the trunk
Check for Additional Headers: Keep custom headers during forwarding
SIP Response for Non-Existing DIDs: Choose how the system replies to unknown numbers
Send History-Info Header: Include call history in SIP messages

PSTN Trunks For physical line trunks (PSTN):
Device Selection: Pick your hardware device (e.g., T100)
Extra Settings: Configure based on your hardware specs
PSTN options only show up after choosing a PSTN device.

SMS
Step-by-Step Guide to SMS in GranSun PBX
Accessing the SMS Section To manage SMS settings, trunks, and assignments:
Navigate to: Master Tenant → SMS

Adding an SMS Trunk To start using SMS, you need to add a trunk that connects to your provider.
Steps: Go to: Master Tenant → SMS → Trunks Click Add SMS Trunk Fill in the required info:
Name: Give it a name (e.g., "Telnyx SMS")
Provider: Pick your provider (Telnyx, Bandwidth, Twilio, VoIP Innovations, OZSMS, or Custom)
Provider Examples:
Telnyx
Turn on "Enable"
Enter your API Key, Public Key, and Messaging Profile ID
Bandwidth
Turn on "Enable"
Enter your API Token, API Secret, User ID, and Application ID
Fields change depending on the provider. Always check your provider's instructions.

Assigning SMS Trunks to Tenants Once your trunk is created, assign it to the tenant that will use it.
Steps: Go to: Master Tenant → SMS → Trunks & Tenants Find the tenant using the search box Click the tenant's name
In "Allowed SMS Trunk", select the trunk
Turn on SMS for the tenant
Click Save
Note: Only one SMS trunk can be assigned per tenant.

Using the SMS Connector for Custom Providers If your SMS provider isn’t listed, you can connect it using a middleware application.
Steps: Make sure the SMS Connector feature is enabled in your license Go to: Master Tenant → SMS → Trunks Click Add SMS Trunk Fill in:
Name: Name your trunk
Provider: Choose Custom
Webhook URL: Enter the URL for your middleware
Auth Token: Create or paste your secure token
Your middleware app should translate between PBXware and your SMS provider.
Managing SMS Numbers You need to link phone numbers to extensions to use SMS.
Steps: Go to: Master Tenant → DID Add or edit a number
Assign it to a tenant
Link it to the correct SMS trunk
Set the status to Active for full use
SMS may still work on inactive numbers if linked to an extension.

Monitoring SMS Activity You can view reports on SMS messages sent from the system.
Steps: Go to: Master Tenant → Reports → Bulk Messages Here you’ll see:
Name: Title of the message
Sent/Total: How many were sent
Time Started/Ended
From: Who sent it
CSV File: File used to send messages
Status: Example: Completed
Message: Text that was sent
Click the message name or CSV to see more details.